| UED2 Main |
| UED2 Tutorial - Bot pathing, Navigation network | ||||||||||||||||||||||||||||||||||||||||||||||||||||||||||
Bots play an important role in UT as they are the only opponents you can play against in single 'human' player. To spare CPU usage and give much better playability performance bots have not been given any navigation AI. That means that you have to tell them how to move around in any given design and situation. This includes how to move from one side of the level to another, where and how to do hammer jumps or using the translocator, where to stand when waiting for a lift and more or less every situation possible. Luckely bots do have a certain level of AI and can cope with some situations without much help, but still they rely on how you as a desginer lay out everything for them. A bots behaviour and level of IQ/AI also relate to what difficult level you select for them when playing. The biggest difference is still how fast they react, accuracy and damage. With this tutorial I will try to explain how to create/use the navigation network. If you want to know more on how bots work and act read my tutorial on Bot AI and Basics. In the actor browser you expand the 'NavigationPoint' for all available bot pathing actors. | ||||||||||||||||||||||||||||||||||||||||||||||||||||||||||
|
||||||||||||||||||||||||||||||||||||||||||||||||||||||||||
|
For some pathnodes I have specific tutorials. This is AssaultRandomizer, ControlPoint, FlagBase, Teleporter and VisibleTeleporter. It is located in my Assault, Domination, Capture the Flag and Teleporter tutorials. Building the navigation network: To actually build the navigation network for your bots you position nodes around the level. The most used of all nodes is the "PathNode". This is simply a node that tells that bot that it can walk here, nothing else. It looks like a golden apple when you place it in the level. This image show you how it will look when you define paths.  Even though you place navigation points you need to select "Show paths" to see how your network is connected. To do this you press the right mouse button on the titlebar for any viewport, select "View" and then "Show Paths". A single pathnode is a single point in which the network is built from. By adding nodes at strategic positions, corners, hallways, stairs and so on, bots are able to navigate from one position to another. As stated a "PathNode" is just a simple node. To make bots understand tricky situations other types of nodes are used. This includes defense points, control points, inventory spots and so on. It is important to know that most nodes from the category "NavigationPoint" works as a navigation node (pathnode) but with specific properties. A good example of this is playerstarts. Its only function is to tell the engine where it can spawn bots and players. While playing the playerstart do not have any useful function. However, bots will still treat this node as a pathnode and it will be a fully functional part of the network. This also applies to the node "InventorySpot" which is placed at all items you place in the level, by the engine when you define paths. This means that you do not need to place pathnodes above items, weapons and pickups to let bots understand that they are able to walk there. In theory you could use weapons, items and pickups placed all around the level and not use one single pathnode and still have a fully functional network for bots to use. When you select define paths the engine will calculate all possible connections between the nodes. A connection is shown with a blue or red line between two nodes and this is a path that bots will consider using. To succesfully connect two nodes with each other they MUST be in visible range of each other and not too far apart. They should not be too close either or bots might get stuck. Meaning that you do not place a "PathNode" at playerstarts, items, and where other navigation nodes is placed. The best way to place a PathNode is to place it on the "floor" in the 3D view. To adjust the position use any of the 2D views. The reason for this is that when you place them in the 3D view they are placed at the most ideal height from the floor. In some cases when PathNodes are too high up, even though you get a line to other PathNodes, bots think they are unable to reach it. Stairs is a bit tricky to pathnode but placing one at the bottom and one on the top usually do the trick. If they do not connect, place one in the middle as well. In some cases you can fix stair problems by lowering the top and middle pathnodes a bit. If there is a gap or edge between two pathnodes a bot might do jumps to get across. In cases like this it is important to place nodes close to the edge or bots might jump and fail to reach the other edge. If the distance, across a gap, is too far the nodes might not connect with each other. To make bots able to navigate through water you need to place the pathnodes in the water and not above it. Otherwise bots try to jump out of the water to reach the node and not swim. To get bots out of the water you should place a PathNode close to the edge and possibly another PathNode almost directly under it. This will make the bots swim for this node and then swim upwards to reach the edge for the other node. Blue or Red line: The difference between a blue and red one doesn't really mean much in a normal situations. A blue line means a "good" connection while the red is a "less prefered" line. This really dosen't mean much considering that bots take the shortest route to its target. However, a bot have a small term AI which is how it should proceed to the next pathnode. Normally a bot would go from the current node to the one in question but if the line is red and it have another route which includes a third pathnode but with blue lines, it could take that route instead. In all cases the distance play the most important factor. The situation you could end up in having trouble with this is if you have a position in which the bot is starting from (a pathnode). From there you can take either the left route or the right and then walk up a platform/stair to the second floor. (One route/side of the design is a complete mirror of the other). If the walking distance from the starting position is the same either you take the left passage or the right but one of them have lots of red lines the bot will take the other passage all the time. Elevators / Lifts: You use LiftExits and LiftCenter to make bots understand how to use elevators. LiftExits is used to direct bots to where it should stand and wait for the elevator and where to go when it arrives. For this you need to place one liftexit beside the elevator and one on the second floor. The LiftCenter must be placed on the elevator and this is the spot the bot will stand while going with the elevator.  A bot stands at the first LiftExit and then moves to position itself on the LiftCenter. When the mover arrives the bot will walk to the second LiftExit and then continue its course. It is perfectly legal for a mover to move in any direction and have more than one keyframe. The bot is more than happy riding it all the way. One thing that is very important when creating support for elevators is that the mover have "StandOpenTimed" and not the default "BumpOpenTimed". Bots think that "BumpOpenTimed" is a door. (This do not apply if you use triggers to activate the mover). Both the LiftExit and LiftCenter have specific "LiftTag" properties which must be set same as the mover tag which you build support for. Simply because you need to associate the pathnodes to the correct mover, to avoid confusing the bot. If you use a trigger to activate the elevator, bots usually understand this as the mover have "Trigger..." instead of "StandOpenTimed", and will be more than happy to activate it before trying to use it. However, lots of people have reported problems getting bots to understand complex triggered elevators. Keeping them as simple as possible might be a smart idea. This problem usually only occure when bots need to use the elevator to get down as well as up. (Normally they would just jump down the shaft). It can, in some cases, be fixed if you set the "LiftTrigger" property for both the LiftExits and LiftCenters to the tag of the trigger. If you want the elevator to stop at multiple floors you need to use "ElevatorMover" and "ElevatorTriggers". You also need to place a LiftExit for each floor to make bots understand where to wait for the lift and where to walk off. Still you only use one LiftCenter though, and it is placed on the elevator at its base keyframe (keyframe 0 (base)). Hammer / Translocator jumps: To tell bots where and how to do jumps work pretty much the same way as elevators. You actually use LiftExits to tell the bot where to stand and prepare and where to "Walk off" when the jump is complete. This means that you need to place one LiftExit on each floor/side and one LiftCenter type where the bots should jump to. By LiftCenter type I mean TranslocDest or JumpSpot. As seen on the screenshot you can see that on the floor is a LiftExit, on the second floor a JumpSpot and another LiftExit. 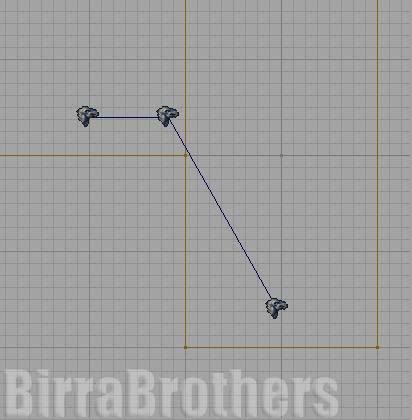 The bot will walk up to the first LiftExit, either shoot the translocator disc or do the jump trying to hit the JumpSpot / TranslocDest, "walk off" to the second LiftExit and then continue on its course. There is some important differences between JumpSpots and TranslocDest. TanslocDest is used when bots MUST use the translocator to get to the destination. Bots will think that they are able to get to the LiftExit they jumped from without problem, from the TranslocDest. If they must use the translocator to get back again you need to replace the first LiftExit with the TranslocStart JumpSpots only tell the bot that they are unable to get to the destination simply by walking. This means that a bot could use the ImpactHammer, Jumpboots, Translocator or LowG enviroment to get to the JumpSpot. Bots will use the best way each time. The priority is Jumping, Translocator and then ImpactHammer. If the bot must use the JumpBoots to make the jump the boots should not be placed too far away. JumpSpots have two properties you can modify and that is bImpactJump and bAlwaysAccel. If bImpactJump is true bots can use the ImpactHammer to complete the jump. Otherwise they will never try it. bAlwasyAccel means that in certain situations bots can or need to use air control to reach the destination. As with elevators all LiftExits and JumpSpots/TranslocDest must be given the same tag or bots might get confused. Doors: Bots will understand and use doors in most cases like "BumpOpenTimed" or "Trigger..." activation. When pathing you usually just put a pathnode on each side and let the bot do the rest of the work. In certain situations, like AS levels, bots can get stuck thinking they can walk past the door even though the right triggers not activated. To fix this problem you use BlockedPaths which is explained later. Ambush / Defense points : Ambush and Defense points are used to make bots camp and defend specifc areas. The difference of the two is that Defense points are team based while Ambush points are not. You use Ambush points to let bots understand that this is a good camp spot or ambush point to attack other opponents. Defense Points are used in the same manner but bots understand that this point is very important to defend. That is why Defense points have FortTag, Priority and Team properties to let bots know when, why and where to defend. Both Ambush and Defense points have bSniping and SightRadius. bSniping tells the bot to stand still and shoot at the opponents instead of going after them. SightRadius is how far the bots should look for opponents. Also know that both are directional and should be placed in the direction you want bots to stand. BlockedPath: Normally bots will be able to walk everywhere at any give time but in AS levels where bots must complete certain tasks before proceeding you need to cut off the paths and open them again at a later stage. This is done with BlockedPaths. They should be placed between two pathnodes and it is also important that no path go around it or the BlockedPath is useless. The BlockedPath is then opened when triggered by any trigger and cannot be made to block the path again. Most used positions are doorways and drawbridges. Inventory Spots, Thinking like a bot: This node is placed by the engine above all itmes, weapons and pickups when you rebuild the navigation network. A bot understand and treat nodes differently. Meaning that bots know that at inventory spots usefull items and weapons can be collected. This can result in bots camping by these positions to wait for the item to respawn. They will not wait for long though, but it is also affected by the setting you have for the bot, regarding camping. Debugging the navigation network: This is very important: Do not expect your bots to play well the first, second and even your third level, not matter how hard you try. Understanding bots and why they do what they do, not picking up all itmes, not able to use elevators, jumping into lava and so on, is something you need to learn as you go. The navigation network is very design and situation specific making a tutorial explaining everything impossible. Debugging is therefore an important part of creating the network, especially in CTF and AS levels. I suggest getting the MindReader mutator which is excellent when you want to see what, why and when bot act as they do. The best way to see how bots act is simply to play as spectator and let one single bot roam the level to see how it handle different situations and if it pick up all itmes. You could do the same even if you joined in the game as a player and then using the "Ghost" command to let you travel anywhere, but bots think that you are part of the current game and will handle things accordingly. If the single bot did well in your map, introduce one or two more bots and see how they interact with each other. Do they still pick up items and reach all parts of the level? If bots do not pick up items when more than one bot is present it can be because it think that the opponent is more important to engange than picking up stuff. The reason for this might be that the area is too big. If you have lava (or other obstacles) and bots fail to get across, they will in most cases die. Placing the pathnodes at slight different positions can fix these problems. You might also see cases, pretty often actually, when bots simply ignore parts of your level and that is even how much you try to lure them there. Then I must ask... Why should the bot go there? If it is a dead-end part of the level and nothing to get, then it is pretty simple. If you have items there, what use do the bot have of it? If it is another enforcer I would say the bot would barely consider it. Bots calculate the route using priorites and how much time it must use to get there. Good levels should not have dead-ends (except for assault) and the bot should not need to sacrifice time and health to get items. The navigation network do not tell the bot that it MUST go there but only that it is possible. Stairs/ramps should pose no real challange. In some cases when the stair/ramp is too steep bots can refuse to walk up and down. Adjusting the height (lowering) of the pathnodes and possibly adding one or two, placed in the middle can fix that. In water bots do not care of the amount of air they have. If you path the underwater too complex and even have a too open area with bodies of water bots might spend lots of time underwater fighting and swimming. In the end they just drown. If this is the case it is important that you do not make them want to swim around by having too much of the "good" stuff placed there. Believe it or not but MedPacks will often become a really high priority when bots badly hurt. If you place them at too difficult places bots might suicide themself trying to get them. This includes underwater problems. A bot might get "stuck" in water or just tramp around at the surface or even underwater. Often this is because the bot either cannot reach the pathnode or it cannot "see" anyone close enough. The get stuck problem can also occure on land when bots seem to be trying to walk through walls/doors. If they get stuck at walls it means that the connection between two pathnodes is too close the the wall. Moving one or both a bit out from the wall can fix this. If they do it with doors it means that they think the doors will open and when they don't, bots get stuck. Setting the correct opening procedure for the door or use "BlockedPath" might be the correct solution. Sometimes bots do not use the elevator or other jumpspots at all. Deleting the pathnodes and place fresh new ones will most likely fix the problem. (This includes the flagbase in CTF levels if bots ignore the flag). |