| UED2 Main |
| UED2 Tutorial - Advanced Lights, Triggered |
You have probably seen it in other games or sci-fi movies. Whenever someone opens a door or enter a hallway or large warehouse all lights lit up one by one, but not before they flicker some first. This looks very cool, but how do you do this in UT? In this tutorial I will show you how to create and use triggered lights to first create a flicker light and then goes steady. To be able to follow and understand this tutorial it is important that you understand lights, movers and triggers. The first thing to explain is that we cannot use regular lights to create the effect we want. Regular lights radiate light all the time and cannot be triggered. In the actor browser under "Light" you have "TriggerLight". This is what we need to use, instead of regular lights. They work the same way but can be triggered on/off. In this tutorial you can create any design you want but keep in mind that you need at least two different light sources. From the picture (below) I have created one small starting room connected with a small hallway through a door. 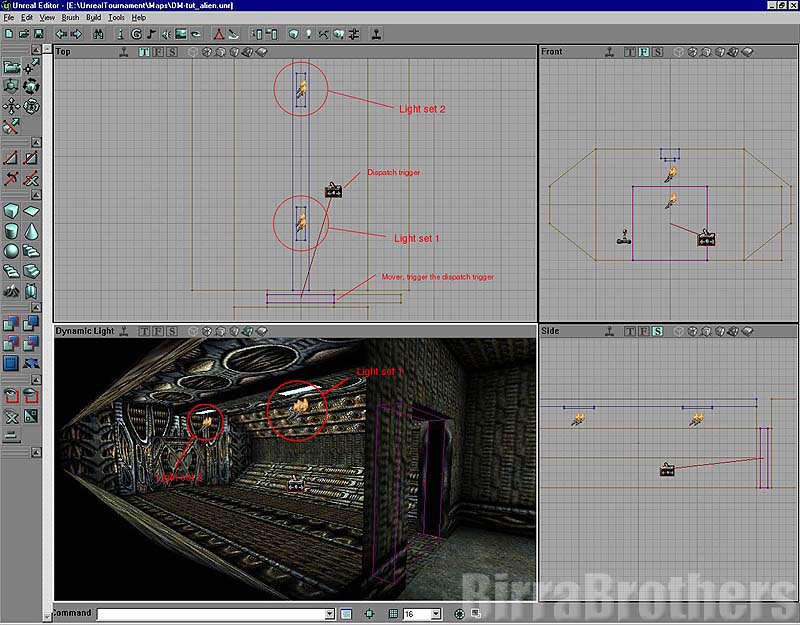 Now, how do we put all this into action? First of all. Place two "TriggerLight" close to each other for each light source. (You should only use two light sets or you need to do some changes). The reason we use two "TriggerLights" for one light source is that one of them will be "Flicker" and the other "Steady". Change the properties for each light as listed: Light Set 1, Light 1, Tag: Light_1A Light Set 1, Light 2, Tag: Light_1B Light Set 1, Light 1, LightType: LT_Flicker Light Set 1, Light 2, LightType: LT_Steady Light Set 2, Light 1, Tag: Light_2A Light Set 2, Light 2, Tag: Light_2B Light Set 2, Light 1, LightType: LT_Flicker Light Set 2, Light 2, LightType: LT_Steady Also make sure that all properties under "TriggerLight" are false, false, 0 and 0. Under "Object", "InitialState" must be "TriggerToggle". By Light Set I mean the pair of lights for each lightsource. By Light 1/2 I mean the first or second light in the Light Set. By light source I mean the visual (texture) light which players see. Now our lights will start black and the hallway will be black as well. These lights need to be triggered and as there is four lights we need a "Dispatcher". Select it from the actor browser under "Triggers" and place it somewhere in the level. Change the tag of this "Dispatcher" to "LightActivate". Now to add all the lights to the dispatcher trigger set. Under "Dispatcher" add; Light_1A, Light_1B, Light_1A, Light_2A, Light_2B, Light_2A to "OutEvents[]". To "OutDelays[]" add; 0, 1, 0, 1, 1 (the rest should be zero). This dispatcher will now trigger the lights but we also need something to trigger the dispatcher. In this example I use the mover to easier show how to toggle the lights on and off. For the "Events" and "Event" type "LightActivate". Also change the "StayOpenTimed" under "Mover" to 12. If you add a player start and play the level you can see how good this looks. This is how it works: When the door opens it will trigger the dispatcher. The dispatcher will trigger the first light (Light_1A) which is a flicker type and will be active for one second. Then the second light (Light_1B) will be activated and the first light deactivated (Light_1A). Then, one second later, the other light set will be activated the exact same way. When you open the door the second time it will do the exact same thing but the steady lights will be turned off in the end. All in all it will give the player the illusion of one single light flickering alot before it turns steady. |