UnrealEd 3.0
The Basics
Key Concepts and Terms
If you've never worked in 3D space before, it's important that you are aware of a few key concepts before proceeding. (If you are familiar with 3D artistry, feel free to skip over this section.)
3D Space allows you to place objects on a plane to create the illusion of perspective. Artists attempt to create this illusion when, say, painting a picture of a landscape with a tree in the foreground and mountains in the background. The tree the artist paints appears much larger than the mountains in the background even though we know that in reality the mountains are much larger than the tree. Another example is looking down a set of railroad tracks. If you stand in the center of the tracks and look off in the distance in the direction of the tracks, the tracks appear to meet at a point even though we know railroad tracks are parallel. This illusion is known as convergence-related distortion.
In UnrealEd, you create this illusion of convergence by placing objects in 3D space. Convergence distortion will only appear in the Perspective viewport, and closely relates the view as it will appear in the game. This is the viewport that shows both the object as a solid form and in the correct perspective. The viewports labeled Top, Front, and Side are known as orthographic viewports. The orthographic views cover the technical layout of your world space. All the light rays travel perpendicular to each other and project onto a single plane rather than converging at an apex as in the Textured view. What this means is that regardless of position in 3D space, all the objects in the orthographic views will appear the same size without convergence-related distortion. As we work more with the editor, it's important to keep these concepts in mind as it will aid you in the correct placement of objects in your world.
As mentioned above, the editor can appear pretty daunting when you first open it up. Let's take a look at the initial screen:
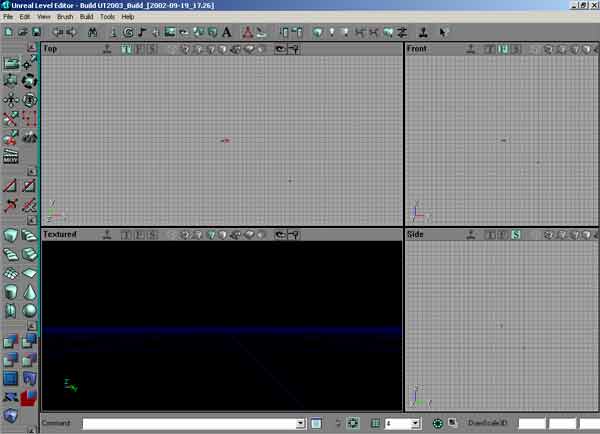
When the first screen appears, you are presented with four viewports you will use to create and position the objects in your world. As described earlier, the three viewports labeled Top, Front, and Side are the orthographic viewports. All the objects visible in the orthographic viewports appear as wireframes and without convergence distortion. The Perspective viewport (labeled Textured in the picture above) is where you'll see each object placed in the correct perspective and textured.
In this tutorial, I won't cover the majority of the buttons on the interface except as they relate to the task at hand. For more specific information related to each button, check out the tutorial on UDN at http://udn.epicgames.com/Two/UnrealEdInterface.html. I will, however, list the buttons we'll use most as we work with a brief explanation of each.
The most widely used buttons are the 10 Primitive Objects, the CSG operation buttons, the browsers, and Build.

In order to create objects in your level, you need to have something to work with, that is, you need to have primitive geometry to build upon. The Primitives at the simplest level are the Cube, Cone, Cylinder, Sheet, and Sphere. Also included in the UnrealEd primitives are BSP Based Terrain, Volumetric, Linear Staircase, Curved Staircase, and Spiral Staircase.
Each of these buttons will allow you to create the objects
for addition or subtraction in your world space. In order to define the
parameters for each object, right-click on the object you wish to create
to bring up a window where you can enter in the length, width, and breadth
along with additional parameters related to the specific object. For
instance, right clicking on the cube (![]() ) button will bring up a window like the one below.
) button will bring up a window like the one below.
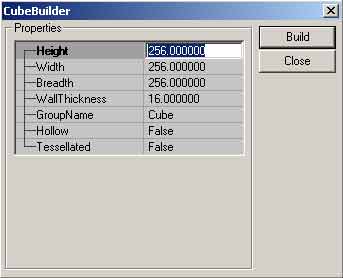 In this window, you can enter in the specific
parameters related to the brush you wish to create. In this case, a cube
with the size (Height) 256 X (Width) 256 X (Breadth) 256 will be built if
you click on the build button. One thing to note, however, is that
Build in UnrealEd terms doesn't mean a space is created for the
player to run around in. Clicking Build only resizes the Red
Builder Brush for later addition or subtraction in your world space.
You'll learn more about this concept as we move through the tutorial.
In this window, you can enter in the specific
parameters related to the brush you wish to create. In this case, a cube
with the size (Height) 256 X (Width) 256 X (Breadth) 256 will be built if
you click on the build button. One thing to note, however, is that
Build in UnrealEd terms doesn't mean a space is created for the
player to run around in. Clicking Build only resizes the Red
Builder Brush for later addition or subtraction in your world space.
You'll learn more about this concept as we move through the tutorial.
The next set of buttons we'll discuss are the CSG Operation buttons. These are the buttons you'll use to create the geometry of your level after you define the parameters as outlined above.. The buttons are Add, Subtract, Intersect, Deintersect, Add Special, Add Static Mesh, Add Mover, Add Anti-Portal, and Volume.
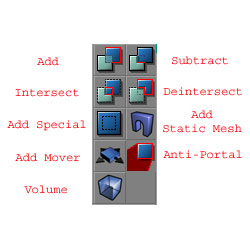
You'll want to familiarize yourself most with the Add and Subtract buttons. The world space in UnrealEd is subtractive space, meaning that in order to create the world of your map, you have to first subtract the space. Think of it as carving out sections of a huge clay block.
Furthermore, the Intersect and Deintersect buttons play an important role in maintaining the integrity of your BSP, or Binary Space Partition in that that carve out sections of a brush to fit perfectly in your world space. The concept of BSP is beyond the scope of this tutorial. For more information on BSP and the BSP Tree, visit http://wiki.beyondunreal.com/wiki/BSP.
For now, suffice it to say that familiarizing yourself with intersecting and deintersecting will cut down on errors in your BSP tree which could result in a Hall-of-Mirrors (HOM) effect. However, in this tutorial, intersecting and deintersecting will not play a major role.
The Add Special and Add Mover buttons are used to add specific objects to your level. Clicking Add Special calls up a separate window from which you can create brushes for portals, zone portals, and mirrors among other things. Again, we won't cover many of these items in this tutorial. The Add Mover button is used to create geometry that moves a player from one point to another, such as a lift.
Finally, the Add Volume Button is the last we'll cover in this toolset. Add Volume is used to create space for water, lava, or other liquid as well as additional options. In this tutorial, we'll touch briefly upon water and lava and leave the others for an additional tutorial.
![]()
The browsers in UnrealEd are where you'll find all the non-geometry related objects (that is, geometry that will affect the BSP treeStatic Meshes are geometry, but they don't affect the BSP geometry of the level). Starting from the left, these browsers are Actors, Group, Music, Sound, Textures, Mesh, Prefab, Static Mesh, and Animation. As you build your levels you'll likely become most familiar with the Actor, Sound, Textures, and Static Mesh browsers. Each of these buttons call up a new window from which you can choose items to place in your level. The Actor and Texture browsers will be discussed most in this tutorial with a brief familiarization on a few others.
The last set of buttons we'll discuss are the Build Buttons.
![]()
Starting from the left are Build Geometry, Build Lighting, Build Changed Lighting, Build Paths, Build Changed Paths, Build All, and Build Options.
The Build Geometry button, as expected, simply builds the geometry. That is, if you subtract, add, or move an object in your world, it will create (or recreate) the geometry in your level. Build Lighting, and it's partner Build Changed Lighting, simply updates the lights in your world. Build Paths and Build Changed Paths are only needed once you've laid out a path network in your level, that is, the network that computer operated bots use to navigate through your level. Build All encompasses the functions of the previous mentioned build buttons, rebuilding everything based upon the settings outlined in Build Options. Lastly, the Build Options button allows you to define the parameters on which the geometry, paths, and lighting are built. For our purposes, and for most of the purposes of level building with UnrealEd, it's best to leave the options at their default values.
Moving On
Now that you're familiar with the most basic and essential functions of the editor, it's time to actually do some level building. The information above is quite a bit to handle, even for this brief of an exposure, but as we move into actually building level, many of the functions and concepts will become clearer. Let's put all of your newly acquired knowledge to good use.
Building your First LevelPart 1»»