Building your First Level
with UnrealEd 3.0
Expanding your Level, Part III
This tutorial assumes you've worked through the first three sections of this series.
So, now we have a very basic level with a couple of rooms. It's not much, but it's a start. In this tutorial, we're going to cover adding Z-axisnot a lot, but enough so you'll get a tastestairs, and static meshes.
|
Key Term! What is Z-axis? Z-axis is something that will give your map a multi-leveled feel. Taken at its base definition, the Z-axis in 3D terms refers to the height of geometry. In level editing, the concept of adding Z-axis to your level means constructing a means for the player to look down upon other sections of the level. These include, for instance, a catwalk with a sniping position where a player can rack up those Headshot points with a sniper rifle. |
We're going to start by adding a couple more hallways to the rooms you already created. These will provide access to a much larger room we're going to create later in this tutorial.
- Open up the file where you saved the previous tutorial if it isn't open alreadytutorial_map2 if you're saving this file in various stages.
- Size the Red Builder Brush with the dimensions Height 256 x Width 512 x Breadth 256. (Hereafter, for simplicity, I'll refer to room dimensions with just their numbers. So, for the new hallway, your dimensions will look like 256 x 512 x 256.)
- Subtract two hallways as shown in the picture below and texture them with the textures used for the two rooms. Don't forget to align your textures as shown in the previous tutorial and to check that they line up correctly. Just worry about the alignment of the long walls, the ceiling, and the floor as the wall at the end of the hallway is going to disappear when we add the larger room.
 (Hint: The floor will need to be sized to .5,
and the walls you can align with the Face command. For the ceiling,
click on Planar and click align. The textures should line up
evenly, so not much tweaking is required, but double check just to make
sure. Doing so now will save you a lot of time later.)
(Hint: The floor will need to be sized to .5,
and the walls you can align with the Face command. For the ceiling,
click on Planar and click align. The textures should line up
evenly, so not much tweaking is required, but double check just to make
sure. Doing so now will save you a lot of time later.)
- Now, we're going to create a very large room that will serve as a center to the level. Size the Red Builder Brush to 2048 x 2560 x 2560, and click on Build.
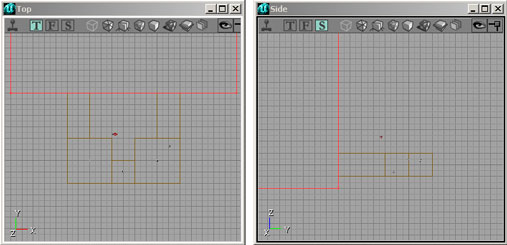
- Using the Top viewport, line up your new large room so that it's touching the ends of the hallways, and center it so that it is 640 units, or five major gridlines, away from either side of the hallways, as in the picture below. Then, using the Side viewport, line up your new room so that it's 128 units1 major gridlinebelow the bottom of your level, as shown in the picture below. You'll probably have to zoom out in the side viewport so you can see the bottom of the Red Builder Brush better.
- Finally, subtract the new room from the world space.
For the texturing in the new room, I chose flr03HA for the floor and cel01HA for the ceiling from the HumanoidArchitecture package. For the walls, I chose wal18midbackHA from the HumanoidArchitecture2 package. These are pretty generic textures, which aren't going to matter much when the level is completed as only the floor and the ceiling will show the most. To align the textures, simply highlight all the faces using the [Shift] + B option, and use Planar from the Surface Properties window.
Now we have a huge room, but no way to reach the floor of the large room in our level other than jumping down. Even so, there is still no way to get back up. So, let's add a stairway that will solve this little problem.
Note: With the current build of UnrealEd and the game, it's adviseable that in making your own levels in the future that you use static meshes to create stairs. However, because this is a basic function of the editorand, more imporantly, because this will introduce you to some key optimization conceptsit's definitely worth including.
 Call up the Linear Stair Builder by right-clicking
on the Linear Stair
Call up the Linear Stair Builder by right-clicking
on the Linear Stair  button.
- With the Linear Stair Builder, you'll notice a few differences from the Cube Builder. Each parameter in the builder is pretty self explanatory, so I won't go into any unneeded details at this point. The main thing to remember when creating stairs is that the height of each step along with the number of steps will determine how high your stairs will reach. So, if you want a staircase that reaches 128 units high, you would set the StepHeight to 16 as in the picture, and the number of stepsNumStepsto 8: 16 * 8 = 128. However, in the case of the stairs for our level, we have to consider how the brush will fit with the static meshes already added to the level. So, set NumSteps to 9 and click on Build. The red builder brush will take the shape of stairs.
 Align the stairs with the floor of the large room
using the Side view and place them next to the left walkway using
the Top view. Place the stairs so that they cut into the filler
mesh just a little, as shown in the picture. You should set your grid
size to 8 to fit it just right.
Align the stairs with the floor of the large room
using the Side view and place them next to the left walkway using
the Top view. Place the stairs so that they cut into the filler
mesh just a little, as shown in the picture. You should set your grid
size to 8 to fit it just right.
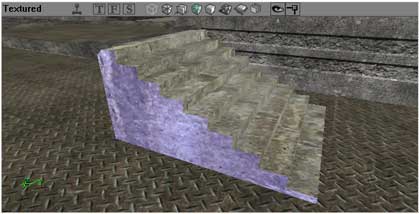
Once the stairs are in place, look at how they fit in the Perspective view. You'll notice a little problem. About 8 units, or half of the top step, overreach the walkway, but if we were to rebuild our stairs with only 8 stairs, they wouldn't fully reach the walkway, and they would reveal some of the non-solid, invisible portion of the filler mesh. So, to fix it, we need to cut away a portion of the stairs.
UnrealEd provides us with a handy tool that allows us to quickly and
cleanly remove portions of the red builder brush before turning it into a
solid. Intersect ![]() and Deintersect
and Deintersect ![]() both buttons found in the CSG toolsetallow you to
reshape the red builder brush. Intersect will cause the red builder
brush to take on the shape of any solid BSP geometry inside it.
Deintersect will do just the opposite; solid geometry will cause
that portion of the red builder brush to disappear. These two functions
are very important when working with BSP-based geometry as they serve to
optimize the geometry and cut down on the number of potential errors.
both buttons found in the CSG toolsetallow you to
reshape the red builder brush. Intersect will cause the red builder
brush to take on the shape of any solid BSP geometry inside it.
Deintersect will do just the opposite; solid geometry will cause
that portion of the red builder brush to disappear. These two functions
are very important when working with BSP-based geometry as they serve to
optimize the geometry and cut down on the number of potential errors.
So, going back to our staircase:
 4. With the grid size set at 8, move the stairwell
down one unit so that 1/2 of the bottom step is outside the space in the
large subtracted room as shown in the example below.
4. With the grid size set at 8, move the stairwell
down one unit so that 1/2 of the bottom step is outside the space in the
large subtracted room as shown in the example below.
5. Click on the Deintersect ![]() button. The portion of the bottom step that is
outside the subtracted room will disappear, leaving you with only 1/2 of
the bottom step.
button. The portion of the bottom step that is
outside the subtracted room will disappear, leaving you with only 1/2 of
the bottom step.
6. Before we add the stairs to our level, we're going to first choose a texture to save us the step of having to add it later. Open the Texture Browser and open up the HumanoidArchitecture package if it isn't open already. Go to the Bases subgroupwe want a simple texture that will work well with the multiple polys on the staircase, so highlight the bas10HA texture so that it is the active texture, noted by the gray box surrounding it.
7. Click on Add ![]() and move the red builder brush out of the way. The added brush
will show as a blue brush.
and move the red builder brush out of the way. The added brush
will show as a blue brush.
8. We also need to fix the texturing, which is easily done by highlighting the entire brush with [Shift] + B, then aligning the texture using the Planar option.
 There is still one last problem with our stairwell that needs
attention. If you click on the side of the stairwell, you'll notice that
the texturing is segmented even though it appears as one solid texture in
the Perspective viewport . Or, to use 3D modeling terms, the
stairwell is divided into a total of 37 different polygons, which can tax
the resources of a player's computer. Re-highlight all the textures on the
stair brush with [Shift] + B and look at the Surface Properties
window. In the title bar of that window, you'll see where it notes how
many surfaces are highlighted. We're going to take an important step to
fix this problem.
There is still one last problem with our stairwell that needs
attention. If you click on the side of the stairwell, you'll notice that
the texturing is segmented even though it appears as one solid texture in
the Perspective viewport . Or, to use 3D modeling terms, the
stairwell is divided into a total of 37 different polygons, which can tax
the resources of a player's computer. Re-highlight all the textures on the
stair brush with [Shift] + B and look at the Surface Properties
window. In the title bar of that window, you'll see where it notes how
many surfaces are highlighted. We're going to take an important step to
fix this problem.
- In the Top view, click on the stairwell brush to make it the active brushmake sure the Red Builder Brush is moved off of the stairs so you can see the blue brush underneath.
- Right-click on the blue brush and select Polygons from the menu, then select Merge as indicated in the picture to the right.
- Rebuild your level with Build Geometry or Build All.
Now, highlight all the textures on the stair brush and see how many surfaces are selected: 21 instead of 37, and the multi-polygon side you clicked on before will now highlight as one singly polygon. There are still quite a few polys on this one brush, which makes a case for the use of static meshes, but the number is a lot better than before. Doing this with all the BSP brushes that add or subtract as segmented polygons on a single face will greatly enhance framerates during gameplay.
Lastly, and perhaps the most important step of all, save your level! Use the filename tutorial_map3.
Forging Ahead
Feel free to pause here if you like. We covered a lot of ground in this tutorial, so you might want to take a break, grab a cocktail and a sandwich, then come back in a bit. Also, while you're sipping your cocktail, feel free to give your level a little whirl to double check the alignment of your textures and how the stairs look in the game. Don't forget to Build All before you enter the game.
Til the next tutorial...